guides
DIY Solar Dehydrator: Dry a Harvest With Free Heat (Honest Build Guide)
A black box, a clear lid, and rising hot air — how to build a solar dehydrator for $30–70, what it dries brilliantly, and the climates (and foods) where it honestly fails.
Honest disclosure: Some links below are affiliate links — Glivox earns a commission if you purchase, at no extra cost to you. We pay full price for products we review and rankings are never paid. Read the full policy.
Our drying guide ends at a fork: herbs and thin chilies air-dry for free, but thick, wet produce — tomatoes, apples, zucchini, jalapeños — needs heat with airflow, which usually means a $40–60 electric dehydrator humming for twelve hours. There’s a third option the homestead tradition never abandoned: build the heat collector yourself and let the sun run it.
A solar dehydrator is gloriously simple technology — a black box that gets hot, tilted so hot air rises past food trays and out a vent. Built from scrap or new lumber it costs $30–70, dries meaningful quantities all summer for $0 in electricity, and doubles as the most satisfying weekend build in food preservation. This is the honest guide: how it works, the simple build, what it dries brilliantly — and the climates and foods where the sun honestly isn’t enough.
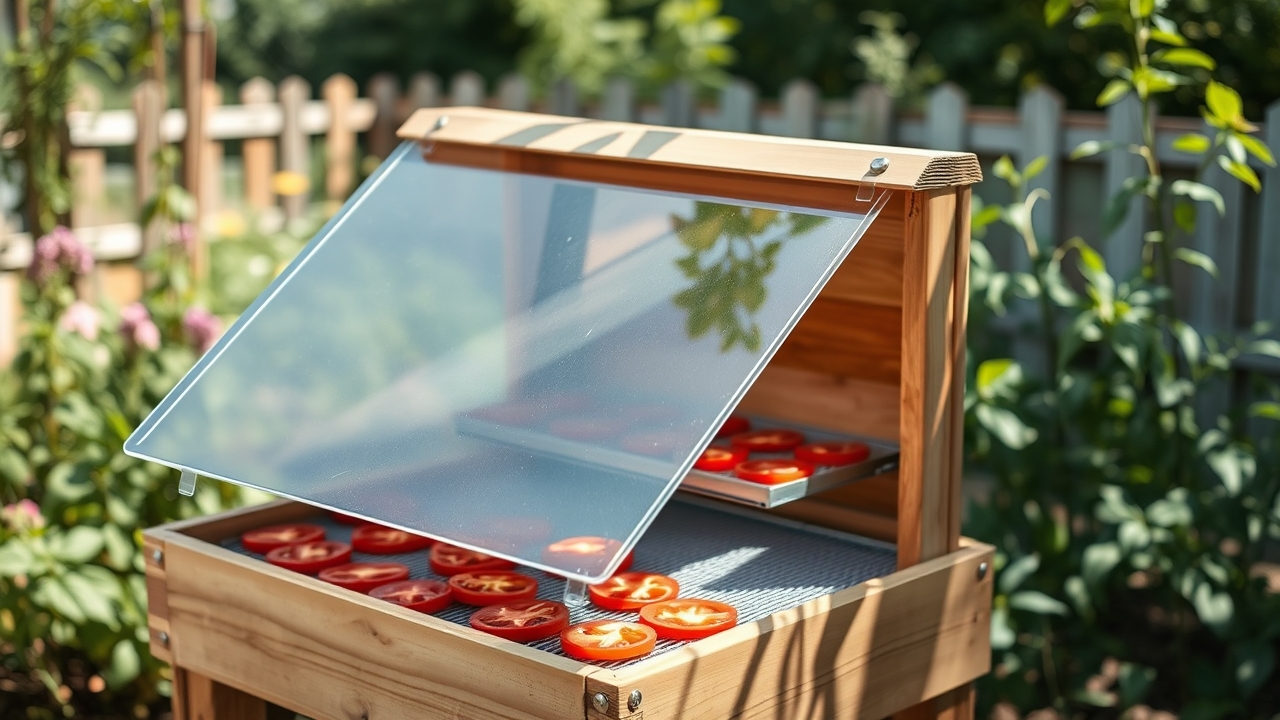
TL;DR — a chimney that eats water
Sun shines through a clear lid onto a black-painted collector surface; the air inside heats 15–30°C above ambient; hot air rises through screened food trays and exits a top vent, pulling fresh air through a screened bottom vent. That continuous warm draft — not the light itself — is what dries the food (direct sun on food actually bleaches color and cooks nutrients; good designs shade the trays and send only heated air past them). On a sunny 30°C day the tray zone runs 45–60°C with steady flow: sliced tomatoes in 1–2 days, apples similar, herbs in hours. What it needs to work: real sun and moderate humidity. What it can’t do safely: meat. In muggy or overcast weeks, the electric dehydrator keeps its job.
Buy it if
you already dry food regularly, your summers are sunny and not swampy, and a weekend build with a drill and saw sounds like fun rather than homework
Skip it if
jerky and any meat drying (needs verified sustained temperature — that's electric-dehydrator territory), or a climate where drying season is also thunderstorm season
Try instead
Not a builder? A $40-60 electric dehydrator does the same food at ~$0.20-0.50 of electricity per batch — the honest math is close; the independence is the difference
How the physics works (so your build works)
Three principles decide whether a solar dehydrator performs or disappoints:
- Heat comes from the collector, not the food chamber. The classic design is a long, shallow, black-floored box with a clear lid (glass, polycarbonate, even heavy clear plastic sheet), tilted toward the sun. Air entering at its low end heats as it travels up the black surface — that’s your furnace.
- Airflow is everything. Warm air must move — in the bottom, past the food, out the top — carrying moisture away. Vents at both ends (screened against insects, always) create passive chimney draft. Too little venting and you build a humid greenhouse that molds food instead of drying it; the #1 failed-build mistake.
- Shade the food itself. The best designs put trays in a chamber above/behind the collector, out of direct light — food dried in moving warm shade keeps dramatically better color and nutrition than food baked in sunshine. If your build exposes trays to direct sun, drape light cloth over the lid section above them.
45-60°C
Tray-zone temperature on a good sunny day (15-30C above ambient) — the same range electric dehydrators target, powered by nothing
The build, honestly simplified ($30–70, one weekend)
The shape: picture a low wooden box ~1.5–2 m long and ~0.5 m wide, tilted at roughly your latitude’s angle, with the lower two-thirds as black collector and the upper third holding 2–4 slide-in screened trays, topped by a vented cap.
- Frame a shallow box from plywood and 2×4 offcuts (scrap quality is fine — this isn’t furniture). Depth ~15–20 cm.
- Paint the interior floor flat black (plain black paint on wood or, better, on a scrap of metal roofing laid inside — metal collectors run hotter).
- Fit the clear lid — twin-wall polycarbonate is light, tough and cheap ($15–25 for this size); reclaimed window glass is free but heavy.
- Build trays as simple wood frames stapled with food-safe screen (stainless or fiberglass window screen rated food-contact; avoid old aluminum screen, which can react with acidic fruit).
- Cut and screen the vents — a full-width intake slot at the bottom, an exhaust slot or ridge vent at the top. Screening both is non-negotiable: the same warm, fruit-scented draft that dries tomatoes is a formal invitation to every fly in the county.
- Tilt it — a leg kit or just a sawhorse at the back. Facing the midday-to-afternoon sun beats morning orientation; afternoons are hotter and drier.
Total cost lands at $30–70 depending on how much is scrap, and the skills required are the same four carpentry basics as a raised bed: measure, cut, screw, check square.
If you like builds like this and want dimensioned plans for the whole homestead list (dehydrators, coops, sheds, benches), the big plan libraries cover them — our honest take on the best-known one is in the Ted’s Woodworking review.
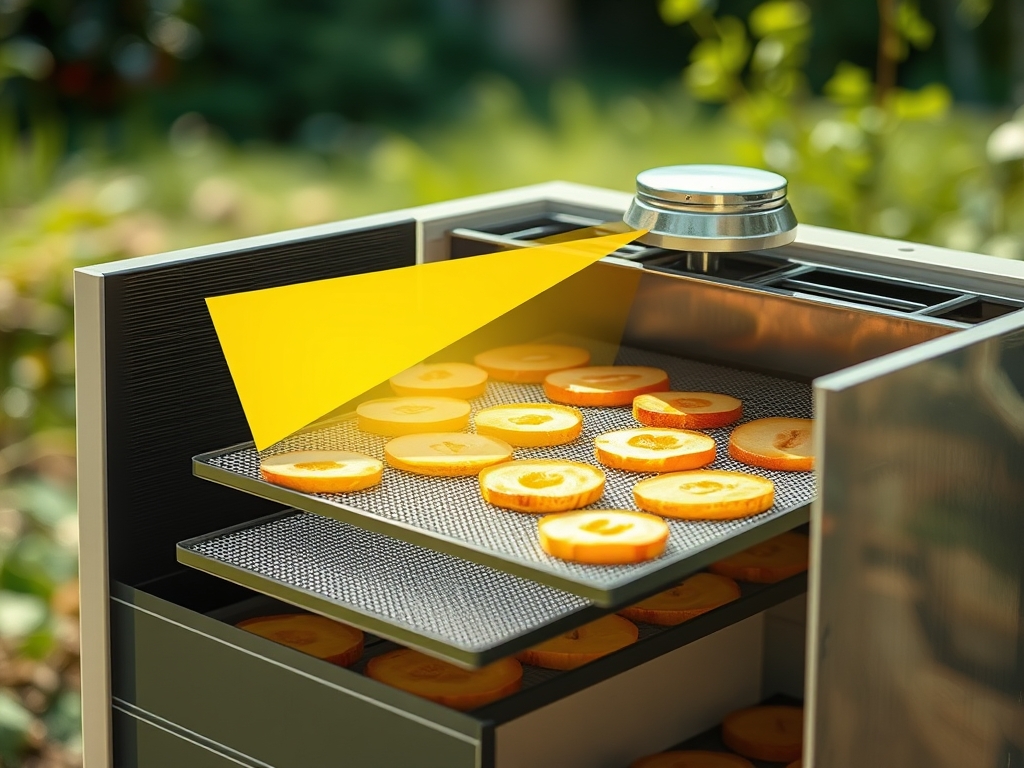
What it dries brilliantly (and what it shouldn’t touch)
The stars: tomatoes (halved cherries or slices — sun-dried tomatoes are the whole reason many people build one), apples and pears, thin-walled and sliced peppers, zucchini (the glut solution nobody expects — dried zucchini chips vanish), herbs by the armload in mere hours, plums, and fruit leathers on parchment.
The honest limits: anything needing verified sustained temperature for safety — meat and jerky above all — belongs in an electric dehydrator with a thermostat, full stop; solar temperature swings with every cloud, and food-safety rules don’t negotiate. High-humidity climates (dew points that soak everything overnight) fight the physics: bring trays in each evening or accept that some summers just aren’t drying summers. And cloudy stretches don’t “sort of work” — half-dried food sitting warm for extra days is a spoilage bet, so start batches only with a 1–2 day sunny forecast.
Finishing rules are unchanged from the drying guide: dry to crackly (vegetables) or leathery-pliable (fruit), condition in a loose jar for a week watching for fog, then store airtight, dark, labeled. And everything preserved needs the same honest storage plan as the rest of the harvest.
Solar vs electric, with real numbers
An electric dehydrator pulls roughly 300–700W; a long batch costs maybe $0.20–0.50 of electricity — over a season of heavy use, a few dollars. So the solar case is honestly not about the power bill. It’s about capacity and independence: a decent solar unit dries bigger batches than a countertop machine, runs with zero grid draw during exactly the season your off-grid systems are earning their keep, keeps the heat and the hum out of the kitchen, and costs nothing to run forever. The electric wins on: rainy weeks, precise temperatures, meat, and set-and-forget convenience. Serious preserving households honestly end up with both — solar for the summer glut, electric for the edge cases.
Quick wins vs. build-killers
What works
- Shade the trays — heated moving air dries food; direct sun bleaches it
- Screen every vent (the fruit-scented draft is a fly magnet)
- Metal collector plate painted black runs hotter than painted wood
- Start batches only on a 1-2 day sunny forecast; finish, then jar-condition a week
What doesn't
- Undersized vents (you built a mold greenhouse, not a dehydrator)
- Drying meat or jerky solar (temperature swings = food-safety gamble)
- Leaving trays out overnight (dew re-wets everything you dried)
- Old aluminum screen for trays (reacts with acidic fruit — use stainless/fiberglass)
FAQ
How does a solar dehydrator work?
It’s a passive chimney: sunlight heats a black collector surface under a clear lid, the warmed air rises past screened trays of food and exits a top vent, continuously pulling fresh air through a bottom intake. That steady stream of warm, dry, moving air — typically 15–30°C above outside temperature — evaporates moisture from the food, exactly like an electric dehydrator’s fan-and-element, minus the electricity. Good designs keep food out of direct sunlight so it dries in heated shade, preserving color and nutrients.
What temperature does a solar dehydrator reach?
A well-built unit on a clear summer day runs its tray zone around 45–60°C (110–140°F) — squarely in the range electric dehydrators target for fruits and vegetables. Output swings with the weather: clouds drop it fast, and mornings lag afternoons. That variability is fine for produce, which tolerates imperfect drying curves, but it’s exactly why meat and jerky — which require verified sustained safe temperatures — should never be dried solar. A cheap oven thermometer inside the chamber tells you what your build actually does.
Is a solar dehydrator worth building over buying an electric one?
On electricity savings alone, no — electric drying costs cents per batch. The real cases for solar: bigger batch capacity than countertop machines, zero grid dependence in peak preserving season, no heat and noise indoors, and a genuinely satisfying $30–70 weekend build. The cases for electric: humid or unreliable climates, precise thermostat control, meat and jerky, and off-season drying. Households that preserve seriously often run both — solar carries the summer glut, electric handles the exceptions.
Why did food mold in my solar dehydrator?
Almost always airflow: vents too small, screens clogged, or a design that traps humid air — heat without air movement builds a greenhouse that steams food instead of drying it. The fixes: enlarge intake and exhaust vents (full-width slots, not drilled holes), verify you can feel warm air exiting the top on a sunny day, and slice food thinner so it finishes within the sunny window. Also bring unfinished trays indoors overnight — dew undoes a day’s drying and gives mold its opening — and only start batches when the forecast promises consecutive sun.
Glivox publishes practical, honest guides for homesteaders and backyard growers — the sun was the original dehydrator; the box just organizes it.
Keep reading
guides
How to Preserve Your Vegetable Harvest (2026 Beginner's Guide)
Drowning in tomatoes and zucchini? A beginner's guide to preserving your vegetable harvest — freezing, canning, drying, root storage and fermenting, and which method suits each crop.
guides
Drying Herbs and Peppers at Home: Air, Oven, or Dehydrator (Honest Trade-offs)
The oldest preservation method is still the easiest — if you match it to the right crops. Hang-drying herbs, pepper ristras, oven and dehydrator honesty, and storage.
guides
Rainwater Harvesting Basics: From First Barrel to Real Storage
Your roof already collects thousands of gallons a year — you're just not keeping any. The honest starter guide: parts, real math, costs, and the mistakes that breed mosquitoes.